SO if you've missed me.. Sorry life has gotten away from us
In the End of April there was a huge explosion at my husbands work, Lakeland Saw Mill. Luckily he wasn't working that night but it still shook us, two men died and several were burned or injured in the explosion..
So after we got over the shock of the whole thing we then realized.. WTF do we do now, do we move so Andy can find work do we stay here and wait it out and hope for a job. Luckily all of his tools were covered by Lakelands insurance so we didn't have to worry about replacing the thousands of dollars in tools he had at work..
3 months later He has now found work, but its not locally and will be gone for 7days at a time.. this will be a test of our marriage and i know hard on us emotionally.. the kids are just shy of 2 and 4 and not having daddy around will be tough on them. But you gotta do what you gotta do..
I"ve been watching my make-up business grow and to be honest and slightly selfish i dont wish to move. I'm getting my name out there and getting booked up.. its pretty exciting :)
Right now I'm trying to work on projects to round out my portfolio like Indian Bridal (Bollywood ish) , I've been working on my face painting skills and LOVING painting pregnant belly's its my newest passion and I get such joy from doing it..
I've been sewing too.. made several little dresses for Lil'L and as gifts.. its one of those things.. I love it and I will always sew.
We had a family reunion in July and it was a blast, did lost of camp crafting and weeded out lots of random art things from my craft boxes
My future craft projects are.. I spy games, and i'd like to make some soft books ... :)
Monday, July 30, 2012


Monday, March 5, 2012
Shaver Holder

So I'm sick of seeing my husbands electric shavers just hanging out on the counter of our small bathroom... Lil'L every chance she has pulls it down and twice its knocked her in the head... so Enough is enough...
I needed a plan ...
So I took a square plastic container ( I think it held juice at one time) cut off the top part.. then punched some holes in the top where the hook would go through, then on one side I cut a slit so the power cords could pass through... then I used a 3m hook (the kids that requires no nails and wont wreck the walls ) attached the hook near the outlet, then pushed the shaver cords through the slit, put the shavers into the container and hung it on the wall....
TAAAAAHHHH DAAAAAHHH a recycled project that took me like 5 mins to create... why didnt I think of this sooner ???
Tuesday, January 31, 2012
Valentines Day gift Ideas


Valentines Day gift Ideas
So I've been busy.. my charity Prince George Dress Dreams has been keeping me busy a little too busy to craft but I found some time tonight to help my kids make some cute presents for Grand parents and Daddy too :)
My kids are 1 and 3 and they dont really draw yet but man can they cover paper in a hurry with beautiful scribbles
And Im lucky to have this huge roll of paper that the two of them can cover in no time, the smile and giggle the whole time...
but then I am left with a huge piece of beautiful paper, I've used this paper to wrap gifts .. this was a huge hit at Christmas and at a recent birthday
and I decided to do a little recycling, I have these great little glass jars (left over from mustard) they are the perfect size for a little something... I then took my big sheets of mrK and Lil'L coloured paper and cut little hearts out of the paper, you could use a punch if you have one but I cut all of mine out by hand.. then i had mrK (he's 3years old) help fill the jars full of little hearts, he was really excited to do this and giggled the whole time and he knew it was his art the hearts were made from...
I then closed up jars and placed a paper over the top and ties a ribbon around then trimmed off the edges like a jam jar...
I then cute a heart shaped "card" and added a little note...
A Waaahlah.. a jar of love :)
MrK and Lil' L have many friends and I wanted to give them a little something ... so I took some of the left over hearts and taped them to a small heart shaped sucker and wrote on the back... "I'd be a sucker if I didnt choose you as a friend Happy Valentines Day !!!! "
Super simple and cost me $2 bucks for 20 suckers :)
Also took a second huge sheet of paper and drew large hearts of all sizes and only gave the kids red pinks and purple crayons to colour with and they went to town as usual. and the nonce done I cut out the hearts and attached them to an scrap piece of lace and hung them from the valance in the kitchen.. both kids LOVE them :)
Saturday, January 14, 2012
Prince George Dress Dreams

So I have a third "child" now....
I started Prince George Dress Dreams ...
These dresses will be given to girls in our community to make their "Dress Dream" a reality...
We are taking nominations for girls in the Prince George community that may be low income, have overcome adversity, are teen moms, or have endured other obstacles such as illness or loss of a family member.
Prince George Dress Dreams will help those who best suit this criteria to receive a dress, shoes, and other prom accessories ...
To donate or nominate a Grad please e-mail us at PGDressDreams@yahoo.ca or mpmakeup@shaw.ca
Donations we are looking for.....
Grad, Prom, "wedding", bridesmaid, cocktail or other fancy dresses of any size in great to Excellent condition
shoes
jewelry
tiaras
wraps
gloves
hand bags or clutches
and any other "prom" accessories
We are also looking for volunteers for
organization
those who can do alterations
pick up drop off "go getters"
and anyone who is wanting to be a part of our team...
for any info please e-mail PGDressDreams@yahoo.ca
This page is sponsored by....
Mp Make-up Artistry Prince George BC
https://www.facebook.com/pages/MP-Make-up-Artistry-Prince-George-BC/200088230001494
Laprairie Creative
https://www.facebook.com/pages/Laprairie-Creative/242445145794756
Wednesday, January 11, 2012
Santa was good to our kids... Kid Craft Retro Red kitchen and Black and Decker work bench .. Reviews from a real momma
So Santa was really good to our kids this year..
Lil'L (15months old) and MrK (3 years & 3months old) they got spoiled...
Lil'L Got the Retro Red Kitchen from Kid Craft.. and I must say this was a gift partly for me :) I think I love it as much as she does... She is a girly girl and loves to open and close , twist and turn and toss everything out of that adorable kitchen :) I put it together in about 2 hrs, one door did give me some trouble but I got it together, but word to the wise, Do do it by yourself on Christmas eve at 10pm at night.. heheheh
Things I LOVE (she loves) about it .... Its adorable , fits into a smaller space, its not HUGE, and yet isnt tiny that she will grow out of it in a year or two.. My 3year old also loves it, his play is much different than her play, he actually makes food :) its bright and colourful, and its a practical play space with lots of space for imagination.
Things that could be changed.. the phone is not attached and is often lost.. or "baked" in the oven, it would be nice if it were attached , or I may just throw on a big peice of Velcro just so we can keep track of it. the paint has chiped on one of the doors , but its still super cute...
I highly recomend this kitchen to anyone wanting to add a cute and stylish toy to your play room.
mrK got the black and Decker Work bench...
And HE loves it, and I love watching him play with it, the tools are wonderfuly cute,and safe :)
He is really into tools like Daddy, and this was a great addition to our play room, easy to put together , my husband did it without instructions, (I had ot fix a part of it later) and it took about 20 mins to assemble it.
MrK's review ... " I like the colours, the sounds and the hammer" ... " I like to cut the pretend wood, and makes the drill go.. buuzzzzzzzz" (shakes hands wildly) I like the hooks to hang my toys, and I like to hamer the hammer" ... ok so he is three .. but I think its a really usefull learnign toy, it teach hand eye coordination, you can pound nails with a hammer, and twist screws and bolts together... hoepfully he will not discover that the bolts and screws (plastic like the toy) are what holds it all together ... or he will be the one putting it back together :)
we didnt realize that two of the tools attached to the bench needed batteries out kids made the "buzzing" sounds without them.. but since batteries have been put in them, I've noticed the bench getting more play action :) My son often pretends he is Handy Manny and orders his tools around .. its pretty cute..
I do wish this toy was some what colapsable so it could be put away easier, its kinda on the big side but we have a large play room so its not so bad.. it would work in his bed room too.. but i fear he'd never sleep :)
all in all its a good buy, we found it at Costco for $50 about $30-$40 dollars cheaper than at Toys-R-Us.... we also bought the extra tools pack for $19 and that was a good buy, he loves the power drill..
Happy 2012 !!!!
So the new year is here !!! Weeeeeeeeee
with the insanity of Christmas and all the family visits and eating to many sweets I kinda got behind in my blogging.. Sorry about that...
anyhoo this year wil be my best, my kids are sleeping better, understanding more, and Lil'L is going ot be potty trained by the end of 2012 I'm sure of it.. MrK is developing and turning into his own person.. ITs amazing to me how they change, and how quickly they have become little people ..
My Goal this year is to review as many products as possible, show off as many cool project idea's I have and will do as many crafty things for my kids as I can.
I'm also going more "full time" into make-up.. Facepainting at kids parties is my "newest" thing and so far its being warmly recived.. I've all so got PG Dress Dreams going full swing right now, We are collecting donated dresses and giving them to deserving girls in our community. That and beign a full time stay at home mom my plate is full and I'm happy with that <3
It's been busy but we are gearing up and ready to go !!!!!
Thursday, December 15, 2011
Hoilday Baking.... nom nom nom nom

So this year I went all out and made about 13 different kinds of Christmas goodies
easy Butter Tarts http://gocanada.about.com/od/wheretoeatanddrink/r/butter_tart.htm
mouse cookies http://www.grouprecipes.com/88220/mouse-cookies.html
midnight mint bars http://www.christmas-cookies.com/recipes/recipe467.midnight-mints.html
chocolate macaroons http://www.joyofbaking.com/ChocolateCoconutMacaroons.html
Easy sugar cookies http://allrecipes.com/Recipe/Easy-Sugar-Cookies/Detail.aspx
Peanut butter cookies http://allrecipes.com/Recipes/Desserts/Cookies/Peanut-Butter-Cookies/
chocolate chip cookies I made mine in mini muffin tins http://allrecipes.com/Recipes/Desserts/Cookies/Chocolate-Chip-Cookies/
Nummy Bars .. this is my Nana's Recipe
1/2 cup butter or margarin, 1cup peanut butter. 1 cup butterscotch chips 1/2 cup chocolate chips put this all into a double boiler melt then remove from heat once cool enough to hold hand to pot add mash mellows then add to a greased pan put in the fridge and your done
Monday, December 5, 2011
How to keep your kids or pets away from your christmas tree


So I have a 1 and 3 year old, and they both are very interested in our tree.. and the presents .. those are defiantly peaking their interest...
So I've put out the "tree gate" ....
Basically a large baby gate called a super gate...
I've used our couch and TV stand as "bases"
and I put on a few bows.. so our gate is now festive and decorative...
This also keeps my cat from eating the bows on the presents .... and the needles ...
Easy Christmas Tree watering system

So I've been asked to share this simple yet effective tool with my blogger fans....
Every Year we get a real tree.. I LOVE a real Christmas tree ...
And ever year I deal with Sap in my hair, needles down my shirt and the ever popular possible tree falling over or small puddles on the floor...
So this year I concocted a simple yet effective watering system...
tools you will need.. a pair of heavy duty scissors , Clear tubing, or an old garden hose, and a funnle that the end bit fits snugly into the tube.
simply cut the tube to your desired length at a good "pouring" height then shove one end into the base of the water reservoir of the stand, you may need to tie it into place make sure not to crimp the hose or tubing..
then fish the tube upwards along the trunk of the tree, then pop it out and put the funnel into the tube, if you can find a green funnel it will hide better... but any colour will work...
Simple and shouldn't cost more than 10 bucks to make ...
Tuesday, November 29, 2011
Salt Dough Ornaments..... Getting Crafty !!!!
Salt Dough Ornaments
Here is the recipe we used:
- 4 cups all-purpose flour
- 1 cup salt
- 1 1/2 cups warm water
- mix flour and salt and add water slowly as you stir....once mixed, knead the dough with your hands until soft and pliable...roll out the dough....cut with cookie cutters...use a toothpick to make a hole in each one for hanging
- place on a cookie sheet and bake at 325 about 1 hour.

Saw this online, and thought I'd share it as well
Saturday, November 19, 2011
Tu Tu cute .... hand made tutu so simple to make...


to make a child's (or adults) tutu is VERY simple....
its a NO sew project so if you can use a pair of scissors then you can make a tu tu too...
materials needed....
Thule or crinoline material
scissors
elastic
decorative ribbons ....
1) Start out by measuring you child's waist
2.) cut length of elastic should be about 2 inches wider than child's waist
3.)then cut your Thule the double the length you would like the tutu to be each piece should be about 5 inches wide
4.)then fold your cut lengths in half and do a lark shed knot (see drawing) the lark shed knot looks cleaner and you get a nice uniformed look when finished
5.) continue doing the lark knots all around waist band then tie a knot in the elastic when you have finished
6.) add a decorative bow over top of elastic knot.. and your all done !!!!
this project should take under 30 mins to do
and shouldn't cost more than $15 dollars to make it :)
I used 6m of fabric to do both tutu's shown.. these are VERY fluffy you could use less but 3m is a good amount for a basic tutu :)
you can make little "tutu " hair clips too.. just attach the thule to the hair clip or around a hair elastic.. the possibilities are endless :)
Thursday, November 17, 2011
More Spin Art !!!!!!


Ok.. So Lately mrK (3years old) has been wanting to do nothing but spin art.. he loves squeezing the paint out of bottles and watching the paper wildly spin around in the salad spinner... Instant gratification for him... and I love it too.. so pretty and easy for him.. I love how excited he gets...
So Today was a snow day.. We received about a foot of snow last night so we decided to stay at home and have an inside say...
So I made up a few "snow man" shapes and then let my son coat them with shades of blues and silvers in the salad spinner....
He thought we needed 4 snow men (there are 4 in our family so that makes perfect seance :) ) I used a heavy card stock ,and drew out some hats , mitts, branches for arms, and carrot noses using markers then cut out each shape.. my son suggested using rhinestones for buttons... and I drew on the "coal" for the mouths with a black sharpie .. and Of course Googly eyes were used for eyes... Any chance mrK gets to use googly eyes he will .. :)
After the spinning part of the snow men was dry.. (paint dried in about 45mins) we used a mix of white glue and some water and I let mrk Glue down the parts where he liked.. he did remarkably well.. faces were where faces should be.. hats on head.. mitts on arms.. and buttons down the front...
I think he did a wonderful job !!!! I love watching him show everyone his art when they come into the room :)
Supplies Needed for this Project........
1.) salad spinner
2.) heavy paper or card stock
3.) scissors
4.) Glue
5.) markers
6.) googly eyes
7.) ribbon to string snow men together
you could also make your snow men accessories out of Felt or other cloth if you like
Glitter could be added for an extra sparkly snow man...
Wednesday, November 16, 2011
A Hand Made Kinda Christmas .....


So this year my goal is to make alot of the presents I give...
I was given a huge box of fabrics, alot were less than 1/2 a meter of fabric so I had to be creative and crafty :)
So the 1st thing I started making was snow flakes, these have been hung in the play room from the ceiling.. and they have stared in the kitchen covering the windows and I hope to make some more for the play room windows too.. the thing I really love about snow flakes is you can put them up in November and keep them up till Mid March...
We decided wit write a little Letter to Santa.. and Since I love to scrap book I got out some of my supplies.. since my son is only 3 we went through the Sears wish book and he picked out some toys and put the pictures on his list.. then I helped him write the letter.. he was very sweet about asking for some things for his sister who is only 1 and cant really talk yet .....
Next I made two "Elf on the Shelf" .. These little guys are Santa's biggest Helpers I named them Merry for the Boy and Noel for the Girl... My son thought we needed two Elf's one to watch him and one to watch his sister... When we go to mail the "dear Santa" Letter.. Merry and Noel will be "mailed" along with the letters.. and if they have been extra good Merry and Noel will return with Santa and all the presents :) (I wont actaull mail Merry and Noel, and I'm sending a photo copy of the kids letter to the "actual" Santa... I want to keep all their dear Santa Letters for when they are older.. : )
As I said I was given a box of random fabrics this year and I have 27 kids on my list so I wanted to make something they could use and would enjoy so I made up 27 little kids Aprons, great for Play, Crafting , and helping cook or bake in the real kitchen ..... They were Very simple to make.. I traced out a "apron" shape onto some newsprint the cut out all 27 aprons.. then used Extra wide bias tape to finnish the edges.. then I used Random ribbons that I had in my collection for the neck and waist ties...
Then because I love my own kids just a little bit more, on their aprons Ive Added a large pocket and their names onto the pocket with fabric...I used the "button hole " feature on my machine to finish the edges around each letter and the Heart and Star... I think they turned out really well... Bright and fun.. and something that will last for years...
Friday, November 11, 2011
Holiday Crafts to do with your kids....


So the Festive season is upon us.. and a friend asked me for some easy -ish craft ideas that she could do with her son.. and as I started to e-mail her I realized.. I should stick this on my blog :)
So here are a few simple crafting idea's to do with your kids ...
1.) Cut out felt in the shape of Christmas trees. or snow flakes . then mount it to stiff paper or an old card.. then let your child drizzle glue all over the tree then put some glitter into a shaker and then shake glitter all over the tree knock off the excess... then cut out the tree... you can make your tree any size, smaller ones can go inside a Christmas card.. frame larger ones as gifts...
2.)hand print Christmas trees.. get a small is.. 8x10 canvas from the dollar store or Micheals .. and paint your childs hands (palm) green then print them.. three across along the bottom.. then two on top and then a third on top to make a TREE shape ..fingers down ward to be the "branches" or leaves" then print a star on the top.. and a brown stem.. and your done.. so simple
3.) last year I printed the kids hands about 30 times (green paint on palm) on a nice thicker paper i think we used scrap book paper.. and then cut out each hand print.. then arranged them in a circle to make a hand print wreath ...then using their thumbs printed red "berries" and put those all over the wreath. hand print red and green wrapping paper... palms painted red or green and then hand stamp the paper .. gives it a home made look  and everyone loves this stuff ..
4.) Mr.K also really liked making bracelets for my sister this year... she loves them.. I bought some nice glass beads and other assorted beads.. nice ones not cheap plastic ones .. and then let him string them on a wire... then I finished the ends with nice clasps.. easy to do with a pair of needle nose pliers... then I took pictures of him making them and sent the picture along with the bracelet...
5.)Mr.K Loved to make the jar candle votive.. you simply rip up some tissue paper, then coat the out side of a jar or a glass with white glue slightly watered down... then stick the tissue up all over the jar.. then coat it with your glue again.. let it dry and pop in a tea light.. mrK also liked sticking stickers to the jar..then tie a festive bow around the tip or bottom and your done.. they turned out well and he loved doing them.. I've got a huge costco sized pickle jar that is going to get this treatment done to it.. and I have a couple packs of battery powered Christmas lights that are going to go inside.. i think it will be a nice easy addition to our holiday decor :)
6.) snow flakes... I've googled snow flake templates and have found 100's of them.. my kids play room is now decorated in snow flakes :)
7.) honey comb (cereal) snow flakes.... get out your glue and a box of honey comb cereal and glue together to make unique snow flake shapes.. then spray paint or hand paint them white or blue and then cover with glitter ... hand with fishing line and marvel at your creativeness....
8.) Count down to Santa... make a Santa head. .then add a long oval sheet of paper for his beard.. mark it with the count down of 24 (start at the bottom 24 and work way up to 1) then as you do your count down you snip off Santa's beard... So cute and simple
9.) apple candles .. using an apple corer cut out the shape of a tea light, then inset your tea light and enjoy super simple and looks so festive...
Wednesday, November 2, 2011
Halloween Candy Wreath....

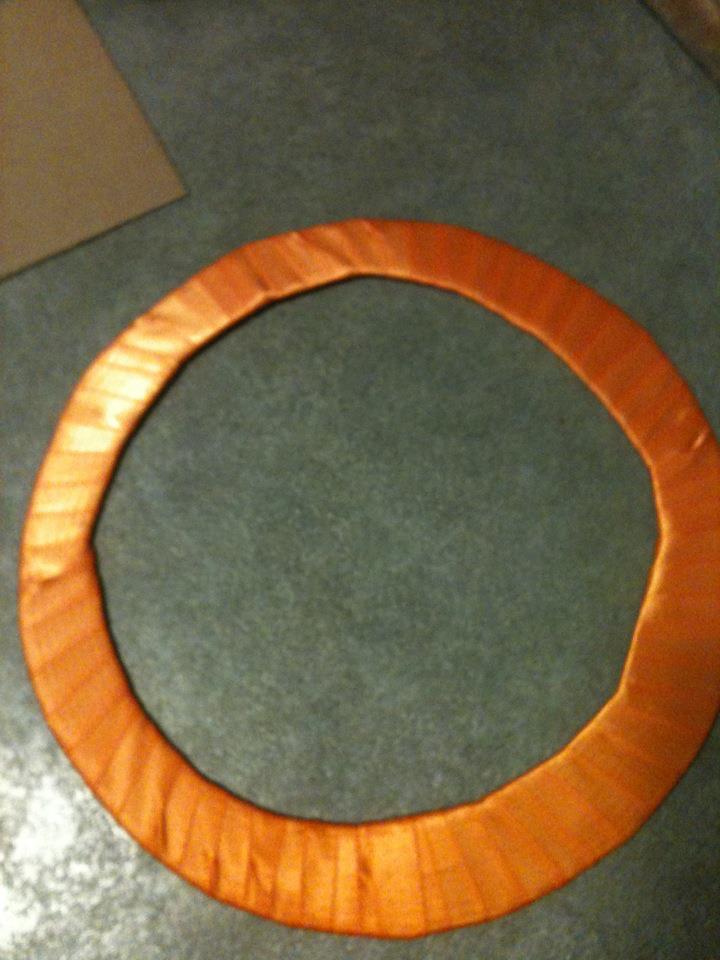


So I'm taking my own advice.. I made a candy Wreath today.. :)
so simple to make...
Step 1..
Cut a circle out of cardboard , I used a dinner plate , traced it, the used a smaller plate traced it on the inside of the big circle..
so I ended up with a "doughnut"
step 2.....
Cover cardboard in what ever you like.. ribbon paint tissue paper fabric.. what ever you have handy...
I used 1/2 inch orange satin ribbon
step 3...
lay out your candies
step 4..
hot glue down the candies...
I accented mine with an orange ribbon and some wired glitter ribbon...
and its now in the Halloween decor box for next year :)
the whole project took me less than 15 mins to make :)
Subscribe to:
Posts (Atom)